Something a bit different this time, a new game by some of our friends here in Greece, Spyros and Myrto, a.k.a Tabletop for World.
Hidden Realms: The Mummy’s Tomb is quite a mix of things. At its core, I’d call it a puzzle game, but if I was feeling really fancy, I guess I’d call it a… spatial optimisation game, with semi-random tile placement. Well, regardless of the definitions, it’s currently running a GameFound project, which ends in less than a day from the time of posting this; a bit of last-minute on our part, but our schedule is rough.
Let’s get into it so that you have a clearer picture.
Gameplay
You are an adventuring cartographer – or perhaps a cartographing adventurer – bravely entering an uncharted tomb of an ancient mummy. There’s treasure and glory to be found… if you manage to navigate your way properly. There are a number of rules, but they’re simple; your first game might be a bit confusing, but you’ll quickly get the hang of it.
The whole game is contained in a single page that you can print and play on anytime – the only extra thing you’ll need is 2 dice, a pencil, and an eraser (since you might need to erase a couple of things you’ve already marked, so a pen might not do). Alternatively, you can also play this on your computer – I’ve played plenty of games of it just opening up the PNG in Paint (or any other image manipulation program that can draw a straight line).
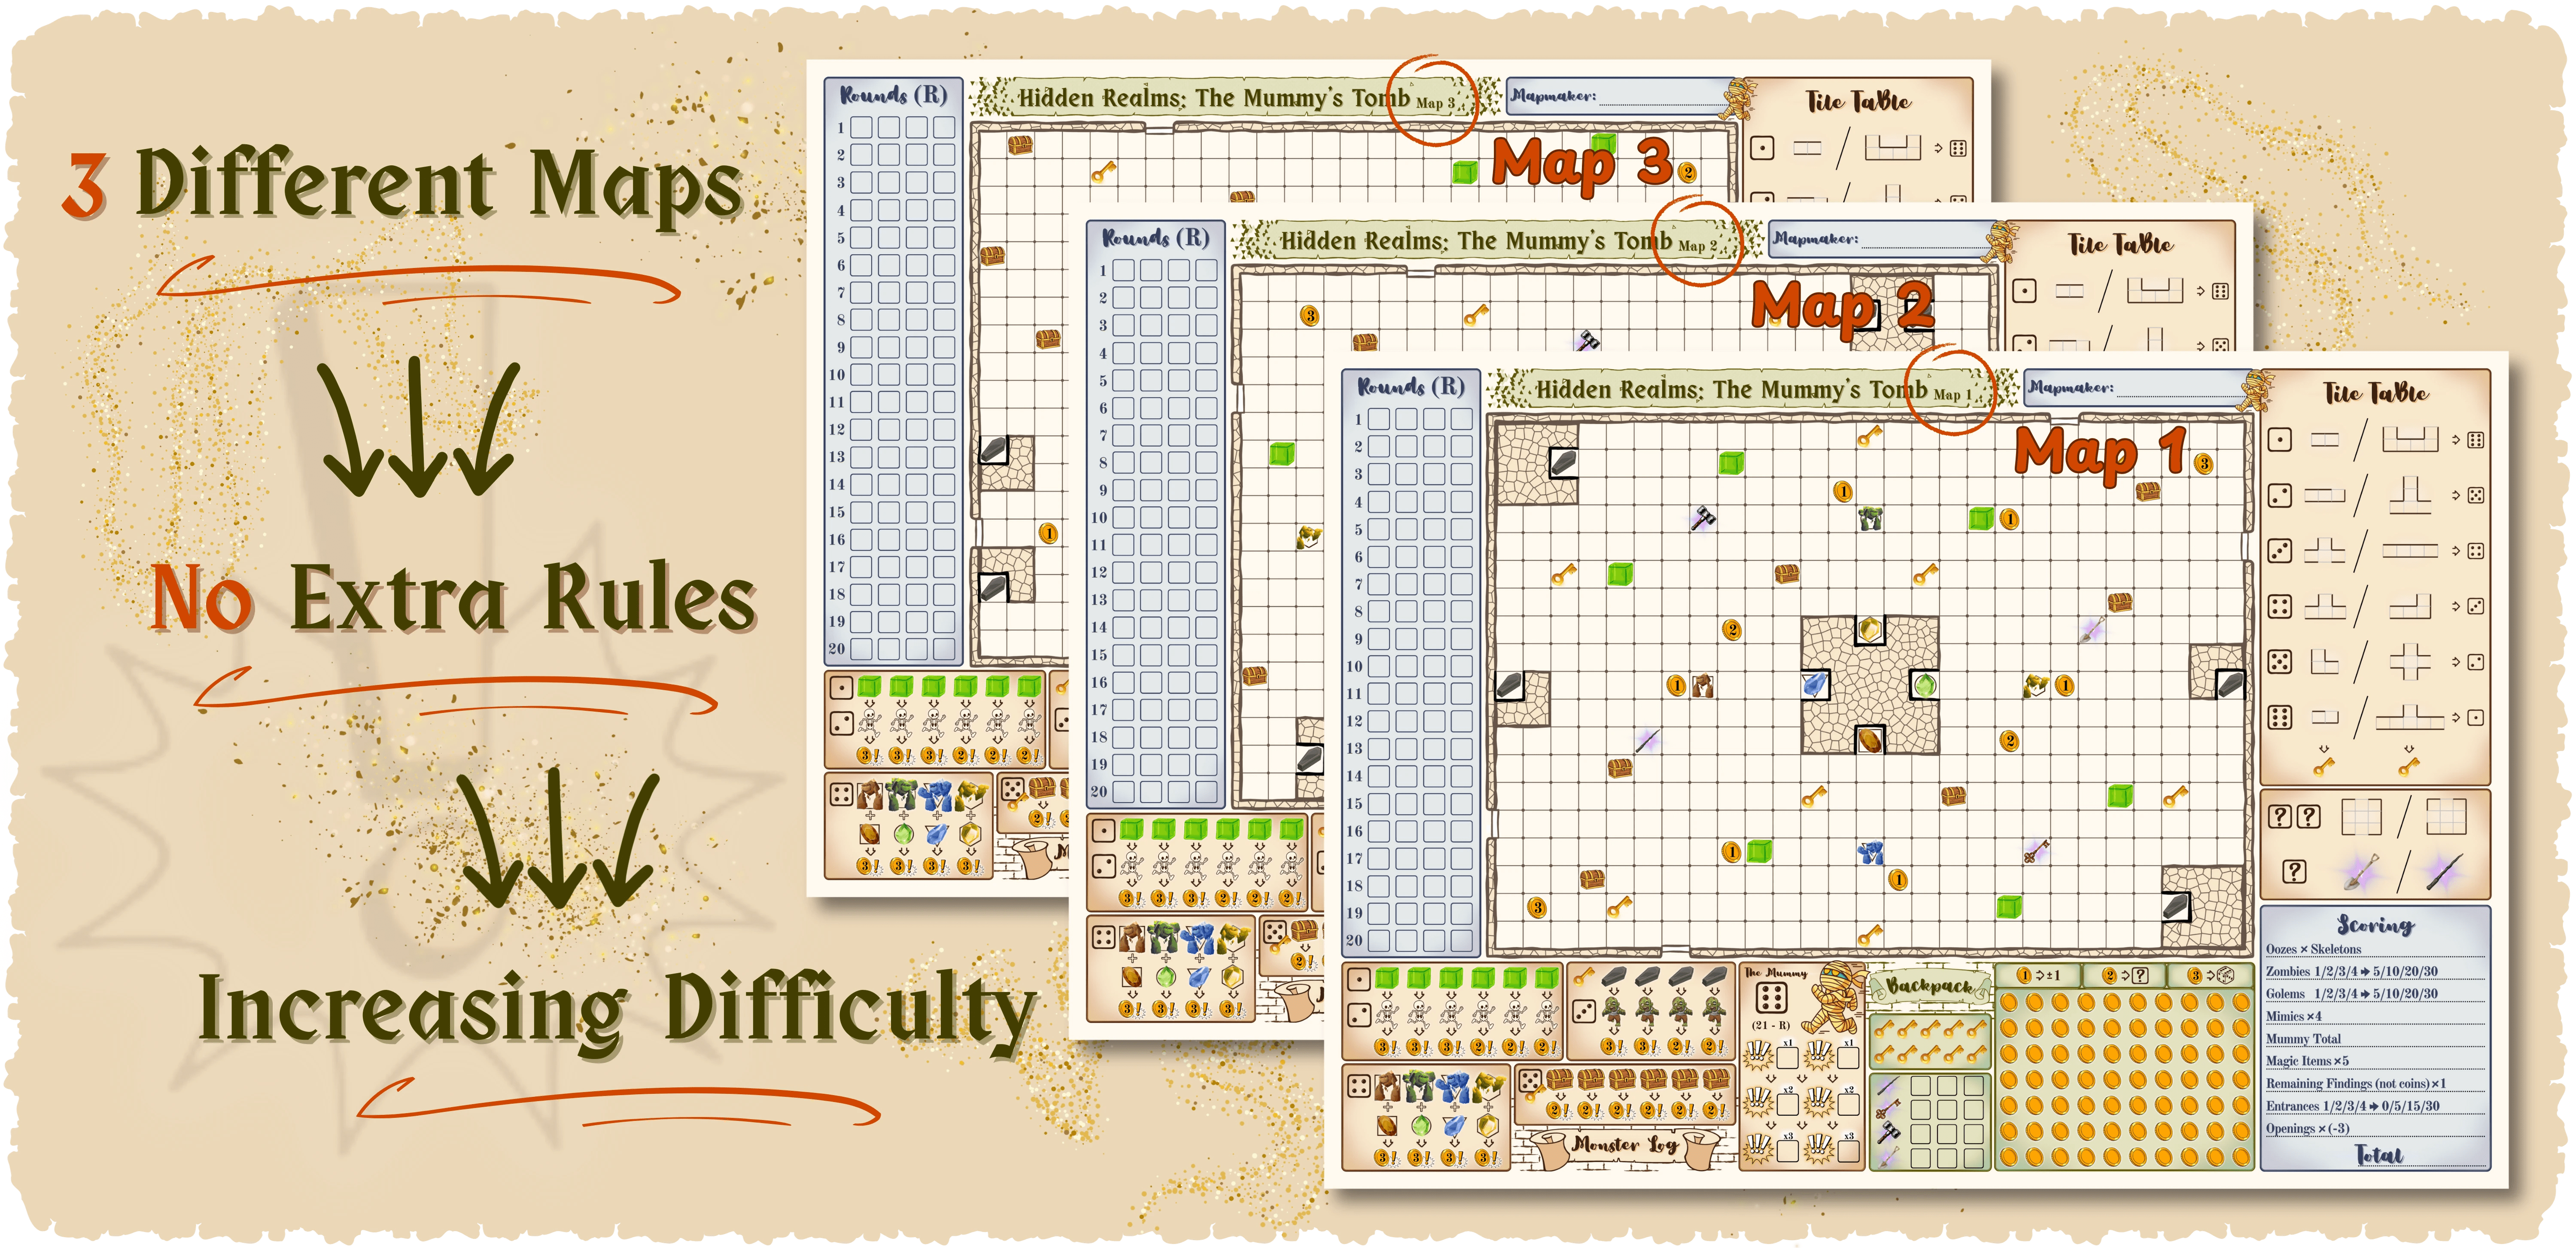
As you can see, your page has the map (which contains a bunch of special tiles), a table of possible tiles you can use on the right (according to your dice roll), a table for what your dice rolled each turn on the left, and at the bottom explanations and markings to keep track of enemies defeated, loot gotten, etc., etc.
The game can be played either solo or with… any number of players, really, although I’d suggest 4 as an upper limit. The game lasts for exactly 20 turns, no more, no less; at the end, the player with the highest score wins. If you’re playing solo, you’re trying to beat your personal best. There are several ways to increase your score: Defeating enemies (zombies, golems, slimes, skeletons, mimics, and the Mummy itself), getting magic items, and having a proper layout for your map – this last part is important to pay attention to, because it can also decrease your score.
Now, let’s talk about what you can do during your round. When you start, you roll 2 dice (standard d6 dice) and mark their result on the boxes of the corresponding round on the left. You can use those dice to place down one of the 12 tiles available, which you can see on the right as I mentioned. Each roll has 2 options, and you can use either – but mark which ones you’ve used already, because when either a “row” or “column” gets fully marked, you get an extra reward: another dice for rows, and a key for columns. Alternatively, you can use 2 rolls to make a bigger 3×3 room, or use 1 roll to either make or delete a single wall. If you have gold, you can also use it; it costs 1 gold to increase or decrease a roll by 1, 2 gold to roll an additional dice (up to a total of 4 each round), and 3 gold to just get whichever number you want. In order to place a tile, you need its “doors” to match with another one – you can’t place them anywhere, anytime (which makes sense). The only special exception to this is the very first placement, which must be on one of the 4 entrances.
So essentially, you are making a path that tries to visit as many “points of interest” on the map. You are quite reliant on luck, obviously, but you have lots of ways of mitigating it, and what really helps is sort of tracing and keeping in mind various possibilities, leaving enough open-ended options that let you make at least some progress regardless of your rolls. Now, what are those points of interest? I mentioned them before, but here they are again:
- Gold: You can use it to roll more dice and/or change your results.
- Enemies: You spend dice rolls to defeat them, and gain score, coins, and progress towards awakening the mummy.
- Keys: You use them to open the sarcophagi to defeat the zombies and to open the mimic chests.
- Magic Items: There are 4 different magic items, each with unique and powerful abilities. They can only be used 3 times each, but they don’t cost you an “action” – a dice roll, I mean.
That’s pretty much it – the only special rule of note is about the Mummy: to hit it, you need to defeat 3 enemies first, and then use a 6. This gives you a number of Fame points (score) equal to 21 minus the round number. There are some additional scoring rules – connecting your path to a second (or third, or fourth) entrance gives you additional points, while leaving openings in your path subtracts points from your final score.
Strategy
Since your every move is reliant on what the dice rolled, you might think that you can’t really apply a long-term strategy, but I would disagree. There are many ways that you can handle and mitigate the randomness. First of all, of course, you have your gold – though I tend to not use the +/- 1, and almost never use the 3 gold to pick a number, but I’ll get more into it in a bit – but more importantly than gold, you need to have a plan. You need to take a look at the tiles you have available, and have a rough idea of where you’re going to put any one of them in the next 2 turns; and you need to have at least 2 or 3 open paths that you can follow along, so that if you need a very specific die roll for one of them but can’t seem to get it, you have alternatives you can expand.
Furthermore, something that I found quite helpful is that raw area and distance are often more important than finding the perfect route. If you can make a long, straight path, you can then use the Shovel and Wand magic items (which you can also use with any dice roll) to either delete a wall to make a new opening or make a turn exactly where you need to. The sooner you have access to large parts of the map, the easier it is to then spread out to hunt down specific points, because – once again – you have more options. More openings, more possibilities to properly utilise any roll you might get, more access to gold and tools to give you even more options next turn. For that reason, I also aggressively use my gold immediately – and almost always spend it 2 at a time to make another random roll. Early on, you don’t need to spend 3 for a specific roll – just expand, expand, expand as fast as you can.
Don’t be in a hurry to defeat enemies. it doesn’t matter in terms of points if you defeat one on turn 1 or turn 20; but it is helpful to have them on a sort of standby. They are like investments; if you have a bad roll that you can’t use at the moment, you can use it on an enemy, get gold, and turn that gold into another roll to try again. The only exception is, again, the mummy. To be honest, I’m not sure what the optimal strategy for it is; trying to score damage on it early will give you lots of points, but it will also leave you behind in tile placement. It’s also rough because it needs a 6, and 6 also has two great tiles; the longest one at 5 squares long, and a small corner one that is often vital in making good turns (turns as in corners, not rounds).
Final Thoughts
I don’t want to keep rambling too much about this, but I think this shows you how much I’ve come to love this game since I first played it – though admittedly I’ve only played the solo mode. As a funny side story, the highest score I’ve gotten is 235, and it was the second ever time I played it – and I haven’t managed to replicate it since then.
In short, Hidden Realms: The Mummy’s Tomb is a ton of fun, with honestly quite a deep strategy. It’s short, it’s infinitely portable, very replayable and pretty simple to grasp; I urge you to check it out, and you won’t be disappointed if you love this sort of puzzle game. And if you do, let us know your personal best high score!
Join Our Mailing List
Do want…
- Extra content?
- Discounts?
- Updates about all our work?
